
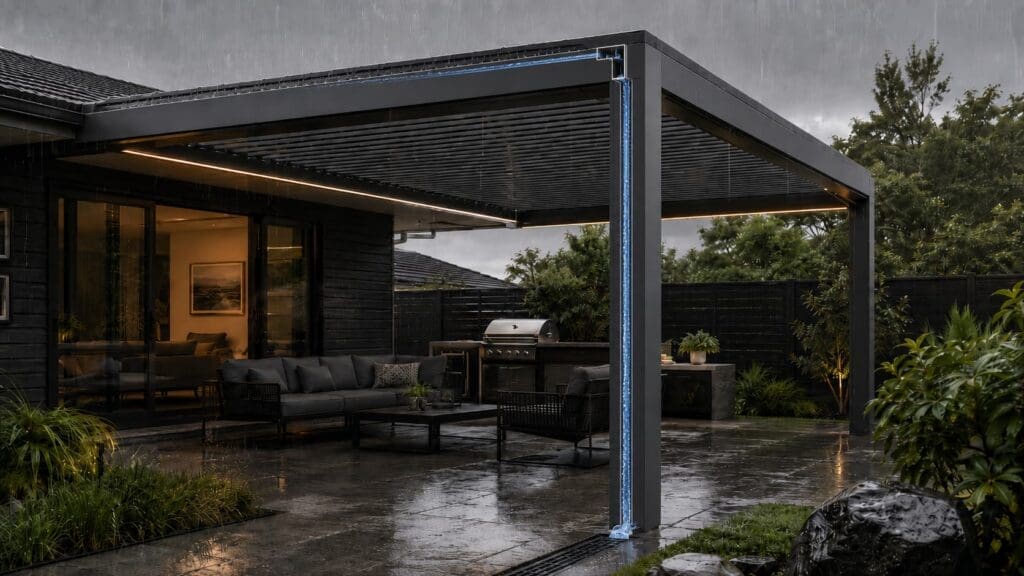
A pergola roof may look simple from the outside, but managing rainwater properly requires careful design. Whether the roof uses adjustable aluminium louvres, fixed polycarbonate panels or a retractable canopy, the water must be collected and directed away from the outdoor area.
A well-designed drainage system helps keep the space beneath the pergola dry, protects the structure and prevents large volumes of water from pouring onto paths, doors, gardens or neighbouring properties.
So, where does all the rainwater actually go?
Most modern pergola systems use an integrated drainage system built into the roof frame.
Rather than allowing water to run directly over the edge of the roof, the system generally follows four stages:
This creates a cleaner appearance than traditional external gutters and downpipes.
When the aluminium louvres are closed, they overlap to create a weather-resistant roof surface. Each blade is shaped so rainwater is directed toward the sides of the pergola rather than falling between the louvres.
The water generally flows into channels built into the roof beams.
From there, it enters the pergola’s perimeter gutter system.
Depending on the pergola design, the gutters may be positioned:
The water then flows toward one or more drainage posts.
A louvre roof may appear flat, but the roof and drainage channels are normally designed with a small fall.
This fall encourages water to move toward the gutter outlets.
The slope may be built into:
Without sufficient fall, water may sit inside the channels instead of draining away efficiently.
This is one reason accurate installation and levelling are important.
Many aluminium pergolas use hollow structural posts as concealed downpipes.
A drainage outlet inside the gutter directs water into the top of the post. The water then runs down through the post cavity before reaching an outlet near the base.
This allows the drainage system to remain mostly hidden.
Depending on the model, the outlet may be located:
Some pergola systems allow the installer to choose which posts will be used for drainage.
This can help prevent water from discharging near doorways, seating areas or frequently used paths.
A common drainage arrangement uses an opening near the bottom of the post.
The water exits through this opening and flows onto a suitable surface, such as:
The surrounding ground should slope away from the pergola.
If the outlet discharges onto a flat surface with no fall, water may collect around the post base.
For a more controlled drainage solution, the pergola posts can sometimes be connected directly to underground stormwater pipes.
The water travels down through the post and enters a drainage pipe beneath the concrete footing or mounting surface.
This may be particularly useful when the pergola is:
Underground drainage should be planned before the concrete slab, foundations or landscaping are completed.
Retrofitting drainage pipes after the pergola has been installed can be considerably more difficult.
A wall-mounted pergola is attached to an existing building on one side.
The drainage system must be planned so water does not become trapped between the pergola and the house.
Depending on the design, water may be directed:
Flashing and waterproofing at the building connection are also important.
Poorly installed flashing can allow water to enter behind the pergola beam or into the building cladding.
A freestanding pergola has support posts around the structure and is not dependent on the house for support.
These systems often offer greater flexibility because water can be directed through several possible drainage posts.
However, the discharge points must still be selected carefully.
Water should not be directed toward:
The drainage layout should be considered as part of the full site plan, not as an afterthought.
Pergola drainage systems are designed to manage rainwater, but every system has a maximum drainage capacity.
During intense rainfall, the gutters must collect and move a large volume of water in a short period.
The drainage performance may depend on:
A larger pergola may require more than one drainage post.
Directing the entire roof into a single post may not provide enough capacity during heavy downpours.
A properly installed louvre roof should direct most rainwater into the integrated drainage channels when the blades are fully closed.
However, a louvre roof should not necessarily be treated in the same way as a fully sealed conventional house roof.
Small amounts of water may occasionally enter due to:
When wet louvres are opened, water remaining on the blades may also drip into the area below.
Allowing the roof to drain before opening it can help reduce this.
Fixed-roof pergolas use solid or multiwall polycarbonate roofing panels instead of adjustable louvres.
These systems normally have a visible or concealed roof pitch that directs water toward a gutter.
The gutter may then drain through:
Because the roof remains permanently closed, careful flashing and sealing are especially important where the pergola connects to a house.
Retractable roof systems can use aluminium louvres, PVC membranes or folding fabric canopies.
Drainage varies depending on the roof design.
A retractable aluminium louvre roof may operate similarly to a standard louvre pergola, with water moving through gutters and support posts.
A folding PVC roof may direct water along the canopy surface toward a front gutter.
The roof must usually be fully extended and tensioned for the drainage system to perform correctly.
Leaving a retractable canopy partly open during rain may allow water to collect in folds or fall directly into the area below.
Even a well-designed pergola can experience drainage problems if it is installed incorrectly or not maintained.
Leaves, seed pods, insects and dirt can collect inside drainage channels.
This reduces water flow and may cause the gutter to overflow.
Debris can sometimes travel from the roof into the post drainage system.
A blocked outlet may cause water to back up inside the gutter.
If the pergola is not levelled according to the manufacturer’s requirements, water may flow away from the intended drainage points.
A large roof may need several drainage outlets.
Using too few can overload the system during heavy rain.
The pergola may drain correctly, but the water can still pool if the surrounding concrete or paving does not have sufficient fall.
Drainage openings can be accidentally blocked by concrete, sealant, mounting plates or landscaping materials.
The outlet location should be checked before the post base is permanently enclosed.
Drainage should be discussed during the planning and check-measure stage.
Important questions include:
Answering these questions early can prevent expensive alterations later.
When a pergola is installed over timber or composite decking, drainage outlets require extra consideration.
Water should not continuously discharge into a concealed area beneath the deck without a suitable escape path.
Possible solutions include:
Poor drainage beneath a deck can contribute to dampness, staining and premature deterioration.
Concrete provides a stable installation surface, but it must have sufficient fall.
Water should flow away from:
A channel drain may be useful where the pergola is located close to the house.
The concrete contractor and pergola installer should ideally coordinate before the slab is poured.
Not every pergola must be connected directly to underground stormwater.
In many installations, water can discharge onto a suitable surface and drain naturally away from the structure.
However, a stormwater connection may be recommended where:
A qualified drainlayer may be required for connections to an existing stormwater system.
Integrated drainage systems require relatively little maintenance, but they should not be ignored.
Recommended maintenance includes:
Maintenance may need to be carried out more frequently if the pergola sits beneath trees.
Yes. The cleaning method depends on the pergola design.
Some gutters can be accessed from above when the louvres are open. Other systems may have removable covers or inspection points.
Do not use sharp tools that could damage:
Before working at height, use suitable access equipment and follow appropriate safety procedures.
Some motorised pergolas can be fitted with rain sensors.
When rain is detected, the sensor can signal the louvres to close automatically.
This allows the roof to begin collecting and directing water into the drainage system.
A rain sensor does not replace correct drainage design, but it can help protect the area when the pergola is unattended.
The roof should still be checked periodically to make sure the louvres close correctly and the gutters remain clear.
Drainage performance depends on more than the product itself.
The pergola must be:
Even a high-quality pergola can experience leaks or overflow if the installation does not follow the system requirements.
For made-to-measure pergolas, a check measure can help confirm the site dimensions, fixing surfaces, post positions and drainage requirements before manufacturing.
Modern pergola drainage is usually hidden within the roof beams, gutters and support posts.
Rainwater lands on the roof, moves into the integrated gutter system, travels down through selected posts and exits at ground level or into underground stormwater.
When the system is correctly planned, installed and maintained, it helps keep the outdoor area comfortable while maintaining the pergola’s clean appearance.
The most important step is deciding where the water will go before the pergola is installed.
Drainage outlets, concrete falls, landscaping and stormwater connections should all work together as one complete system.


